DIY Baby Birthday Banner

DIY Baby Birthday Banner

Ok, this DIY is a throwback to a birthday banner I made for my godson Lawson last year.   Not only was it easy, but it was so much fun to make!!  It came out so cute that I made another one for my niece Mallie.

This throwback makes me sad.  Lawson was so much tinier!!  Now he is a big brother.

IMG_3183

IMG_3183

IMG_3182

IMG_3188

DIY Birthday Banner – from http://fromdahliastodoxies.blogspot.com/2012/11/baby-birthday-banner-tutorial.html

Things you will need:

  • 8 – 10 sheets of paper with baby faces printed on them (this is a strange statement)
  • 2 white posterboards
  • patterned paper – I used those fun scrapbook papers and bought a different one for each face, so 8 pieces.
  • double stick tape
  • glue stick
  • scissors
  • tissue paper
  • ribbon

For all the dirty details, head on over to the link above, where there are great directions.  One thing I did differently was to use color photos of Lawson, rather than black-and-white.  Also, I didn’t print the pictures on card stock (didn’t have any) – instead, I printed on normal paper and and glued them to a poster board.

Finally, make sure you find pictures of the baby with the funnest expressions, like his tongue sticking out or even ones where he is wearing sunglasses.

Have fun with this project!!  If anything, it’s just fun to go through old pictures of the little one.

Posted in DIY

Sewing Pillowcases

If you are interested in sewing and want an easy peasy and fun first project, decorative pillowcases are the answer.   I seriously sewed one up in the time it takes to drink a cocktail.  I know this because I did it while my husband and his friend had a pre-bar cocktail at my house.  While they went out, I had a wine and sewing night. I’m caaarazyyy like that!  These blissful kind of nights are what my friend Liz and I refer to as “spinster nights.”  Food, rom coms, wine, no boys, bubble baths – whatever your heart desires.  I ate so much spaghetti, and no one was there to see it.  🙂

Anyway, these pillows were also crazy cheap.  I got the funky fabric and down pillows/inserts on sale (for about 6 bucks total) in New Orleans at The Creole Cottage.  And boy did they come out cute.  This is a lot of color and pattern for me – I’m really a neutral kinda girl – but my house was getting a little toooo neutral.  So this pop of color looks fantastic, especially on the cream sofa.

DSCN0227

DSCN0229

Here is a back view of the envelope pillowcase.

DSCN0228

For the tutorial to the pillowcase, head on over to DIY Kinda Girl.

The only thing I will add are cutting instructions for pillows that are not 20″ squares:  For any other size square pillow, add 1″ to the size pillow (check the tag) for cutting your main square.  So for a 12″ pillow, one of the pieces to cut will be 13″ x 13″.  For the other two pieces (which are the same size as one another), the length will again be 13″ (12 +1), but the width will be shorter than 13.  These will be the two pieces for the envelope side of the pillow.  I recommend doing the number equal to your other size cut-out dimension, in this example 13, adding 5″ and divided by 2, rounding up to the next whole number if necessary.   Here, 18 (13 +5) divided by 2 is 9″.  So my pieces to cut out would be 1 piece that is 13″x 13″ and 2 pieces that are 13″ x 9″.   I hope that makes sense.

I promise the hardest part is figuring out the pieces you need to cut and cutting them.  Otherwise, there is just a little sewing which is minimal and very easy – straight line sewing woo hoo.

Posted in DIY

DIY Reversible Superhero Cape

If you’ve ever visited my site, you probably have heard me mention my two toddler nephews whom I’m obsessed with! They are both two years old and bring so much joy to the Jones family.  Well, the older one Casey has recently become fascinated with costumes, thanks to Halloween.  I asked him what he was going as, and he responded, “Costume!”  He went as spiderman and loved it – though he demanded a costume change before the night was out.

I found this awesome tutorial for sewing a reversible superhero cape and made them for the boys for Christmas.  I did one side Batman and one side Superman.  Perfect for a costume change!  I was still shocked at how much the boys loved these capes.  Casey was running around in only his diaper and cape, YELLING, “BATMAN CAPE! BATMAN CAPE!!!”  Pretty cool.

DSCN0152

For the instructions, go here for the free pattern/template for the Batman and The Flash logos and here for the free pattern/template for Superman logo and the actual cape. This site contains the detailed instructions and tutorial.  Yes, I know it’s spread out, but all in all, you get a free pattern and detailed tutorial!

These were easy to make, though a little time consuming.  Here is Lawson, my awesome godson, modeling each side of the cape.

DSCN0109DSCN0112

Did you know superheroes play musical instruments?

DSCN0122DSCN0121

They also chase each other through kitchens.

DSCN0116

And race up stairs.

DSCN0176

And completely melt your heart, cape or not.

DSCN0085

DSCN0084

Ugh, I miss them already.  I sure wish my siblings and I lived in the same state.  Maybe one day 😉

Posted in DIY

Owl Tag Toy

For a Christmas gift for two baby nephews, I made the most darling little Owl Tag Toys.  Two More Minutes had a free pattern and detailed tutorial, which I love.  I am still enough of a beginner at sewing that pictures are so helpful.  I did my owls in blues since the babes are boys and added funky, colorful tags.

IMG_6347

Tag toys are basically toys surrounded with tags – obvious description?  Babies like to grab and chew on and rub tags on toys.  Sure enough, my godson Nico immediately started chewing and grabbing the tags when I gave him his toy.

IMG_6440

And here is little Lincoln napping with his.

IMG_6354

These were relatively quick to sew up.  The only annoying part for me was hand sewing the gap  closed – ha.

Head on over to Two More Minutes for the pattern and tutorial.

Posted in DIY

Christmas Stocking Tutorial

And the Christmas crafts continue!!  I finally completed our Christmas stockings.  This is a high quality, sturdy stocking – it is lined and also has batting.  You don’t want a sagging stocking! I used this tutorial, which I HIGHLY recommend.  Free pattern and picture tutorial.  The very best combo.

Head on over there for all your instructions.  The most time consuming part of this tutorial is cutting out all your fabric.  Otherwise, all I will add is that I sewed a full 1″ seam allowance for my cuff – otherwise, the cuff is too wide for the body of your stocking.

My stocking is the cuter one, obviously – the candy cane and peppermint one!  I picked more masculine-looking fabric for Geoff.  I’ll have to hand embroider our names on… Maybe next year.  🙂

IMG_6205                 IMG_6206

As you know, I live in a teeny tiny house (an old kitchen house).  Therefore, our stockings are hanging between two windows.  It was either that or over our beds.  Which would been pretty cool to wake up to.

Image

Posted in DIY

Christmas Tree Skirt Tutorial

I finally made a cute Christmas tree skirt! Last year’s skirt I sewed was cheap-o looking.  While looking through a fabric store, I randomly came across this red and gray plaid flannel and thought it would be a great Christmas fabric that wasn’t overly cheesy.  Not that there is anything wrong with cheesiness for Christmas.  This article perfectly sums up my feelings on Christmas decorations: “If you’re doing seasonal decor right, it’ll look like a reindeer barfed on your doorstep.”

I found this simple tutorial for sewing a tree skirt.  Though there is not a free pattern like I usually like, a pattern would make things more time consuming here.  Trust me.

Again, I will not reinvent the wheel by copying all the info on this tutorial.  Seemingly Smitten has perfectly detailed instructions with pictures!  If you want this to be your “forever” tree skirt, I suggest substituting the “lining” with another fun fabric.  Then you will have a reversible tree skirt!  My lining was plain green felt, so if I am ever in a somber Christmas mood (gasp!), I can flip it to that boringness.

I did a glittery gold ribbon for the bows to offset the country-ness of the plaid.

IMG_6167

IMG_6162

Mr. Tabasco Man gave his approval.

IMG_6166

Posted in DIY

Simple Stain Project

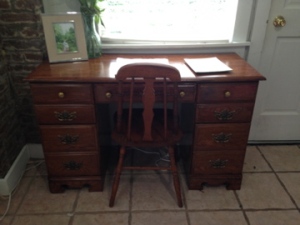
I bought two antique side tables and a desk off of Craigslist to save some money.  Neat pieces that needed some work.

ImageImage

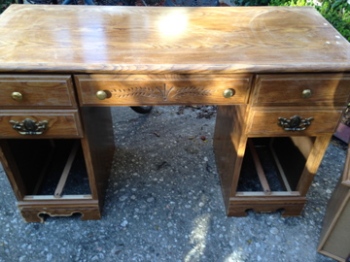
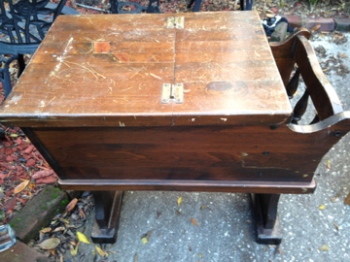
This is the biggest furniture we can fit in my house.  The narrow side tables are perfect. And the whole inside is storage!  If not for the scratches, I wouldn’t have touched this pretty wood.  The desk, really my sewing table, is too light for my taste.

My experience with messing with furniture is limited to this Annie Sloan Chalk Paint Project I did.  And I didn’t want a house of painted furniture.  So I went on a search for an easy way to stain the wood.  I came across this little tutorial on Artsy Chicks Rule.

It looked super easy.  Rather than having to stain it and then put a gloss on top (the normal procedure, says my google results), it uses Minwax PolyShades Stain & Polyurethane – basically a 2-in-1 stain/gloss.  That means you have to: 1. Lightly sand; 2. Apply stain/gloss; and 3. Repeat as desired.  Pretty simple.

Things needed:

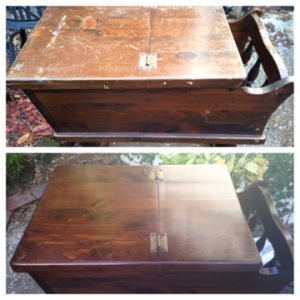
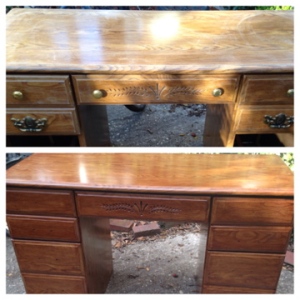
  • Minwax PolyShades Stain & Polyurethane – I chose the color “Bombay Mahogany Satin.” I was very happy with the color.  It just slightly darkened my “darker” piece, and it darkened and reddened (not too much) my light piece.  In other words, the colors will show up differently depending on the wood you start with.  This caused both pieces to look cohesive together, but not matchy matchy.
  • Light sanding paper (around 220 for first sanding before application and around 320 for between coats)
  • Foam, bristle brush, or sock to apply stain

In googling the Minwax stain/polyurethane, most complaints regarded the application.  Mainly that, when using a brush, the finish came off tacky (not like denim on denim), dripping, and uneven and you could see the brush strokes in the stain.  Some random comment suggested to use a sock to apply the stain.  I did that, and it worked perfectly.  Thank you, random internet commentator! In this method, your hand applying the stain does get covered in the stain.  But nail polish remover fixed that quickly.

Really, as stated above, the steps are as easy as this:

1. Make sure your wood is clean, and lightly sand the entire piece.  Brush off debris.

2. Apply your stain.

3. Let dry completely – the can suggests 7 hours.

4.  Lightly sand the piece with your finer paper, brush off debris, and apply more stain as desired.  (Sand between each application.)

Here are my before and afters.  With the side tables, I only applied ONE coat of stain.  I did love the wood to begin with.  But look how all the scratch marks are just gone!

IMG_6149

For the desk, I did three coats.  I probably would have done four, but rain was coming.

IMG_6152

It fits perfectly in our home.

IMG_6159

Not too shabby for a beginner!!!

Posted in DIY

Santa Wreath

Yay I successfully made the cutest little wreath, if I do say so myself.

IMG_6139

I am reallllly bad at wreaths, so this is obviously super easy if I could do it.  I should have posted about my last attempt at a “fall harvest” wreath.  Saddest straw wreath you ever did see.

I used this tutorial, which was awesome.  Definitely head over there and check it out.

Things you’ll need:

  • 3 1/2 yards of white tulle from a bolt, cut into 15″ x 5″ pieces (try to be most accurate with length, so the beard looks uniform).  If you can find white tulle on a spool, just cut to 15″ pieces.
  • 12″ wreath form, preferably white
  • 1 adult sized santa hat – get one that fits on the top of your wreath form
  • Hot glue gun, scissors, pen

First, place the Santa hat on the wreath form and mark where each side ends with a pen.

IMG_6121

You’ll only be putting the tulle up to this point.  Remove hat til later.

Next, all you do is tie your 15″ strips around the wreath, from one mark to the other.  Knot the strips like so.  I double knotted them.  You’ll want the knot to be at the top side of the wreath when laying flat down for a fuller beard.  I didn’t do this correctly, but you should be able to easily adjust it at the end like I did.

IMG_6124IMG_6127

Finally, glue gun your hat on!!! Stuff the hat with leftover tulle to make it fuller.

If you want to make a mustache for the beard, check out the tutorial link.  I wanted to keep it simple as I am prone to wreath disasters.

IMG_6130

Depending on how you are hanging your wreath, add some type of hook to the back.  I followed the instructions on the tutorial and hand sewed a piece of scrap fabric to the back as a little hook.  No one will see this, so it can look like a five year old did it.

IMG_6131

I love looking at this fun Santa on my door!!

IMG_6132

Geoff likes it, too. Ho ho ho!

IMG_6140

Posted in DIY

Sewing Christmas Goodies

It’s my favorite time of year – CHRISTMAS!!  Who will ever forget that feeling of digging under a tree for presents and trying to figure out what they are?  Or listening to your mom play carols on the piano? Or re-enacting the nativity with your extended family and fighting over who can be Mary and baby Jesus?  Ok maybe that one is just my family.

One thing I believe is that Christmas should not be fancy.  (But to each his own.)  I like messy Christmas trees with colored lights and handmade ornaments… I still don’t know what to do with those fancy Radko ornaments I’ve gotten.   I like silly Santa wreaths and heartwarming decorations.  I just can’t get the same feeling from a Pottery Barn Christmas display.

I always get to sewing around Christmas.  Stockings, Christmas tree skirts, Christmas baby clothes…  Sometimes, they are not pretty.  Last year, my stockings were tee tee tiny and ridiculous.   But there is something you get in making it yourself.  An extra Christmas joy!

I am always looking for easy, basic tutorials online with a free printable pattern.  You do not need to be a master seamstress (I’m looking at you, mother) to sew these.  I highly suggest investing in a basic sewing machine and some introductory lessons.  Because sewing is SO fun and rewarding 😉

The websites I use have such great tutorials, I won’t knock them off here by copying and pasting all instructions.  I’ll just share my faves with you.  Today, a Christmas (or anytime) outfit for a baby boy or toddler.

Bow Tie Onesies – free pattern and tutorial at Schwin & Schwin

This is one of the cutest, easiest things to sew.  You buy white onesies (short or long-sleeved) and sew a simple little bow tie on them.   It really doesn’t get easier than that.  AND it’s a BABY in a BOW TIE – come on.

Simple Baby Pants – free pattern and tutorial at Make Baby Stuff

I like to sew some baby pants to go with the bow tie onesies, using the same material.  It is a more finished look than a baby running/crawling/rolling around in a onesie, not that I mind that adorable sight.  Chunky legs preferred.

(I do not sew the cuff and pocket on these pants.  I keep it very basic.)

Ok, so I made two outfits for my new nephew Lincoln.  One Christmas outfit and one Clemson outfit (parents are big Clemson people).

Image

Here is my stuffed animal Laurie wearing the Christmas outfit.  He was a little stocky for it.

Image

Image

Happy sewing!

Posted in DIY

DIY Child Safari Vest

With Halloween coming up, I’ve been thinking of some easy DIY costumes.  For my nephew’s second birthday, we went on a Safari Tour in Folsom, Louisiana (highly recommended!), so I made him the easiest and cutest little Safari Vest.   It takes under 30 minutes to make.

This would be very cute for a last-minute Halloween costume.  I used this website as my tutorial, which has great step-by-step pics.  I did not take shots of the project while I was making it.  Things are much harder to explain in words than to show by pictures, so if you get confused, head on over to that website for pics!

Safari Vest 

Items needed:

  • Brown paper grocery bag
  • Scissors
  • Glue
  • Pencil or pen
  1. Cut the handles off of your grocery bag
  2. Lay the bag flat on the floor, with the open part of the grocery bag (where cut handles were) nearest you.  The top side facing you is the all flat side (which will be the front of the vest), and the bottom side facing the floor has the extra flap that expands the bag when opened (which will be the back of the vest).
  3. Next, trace a V at the top center of the bag and trace two armpit holes on the top right and top left corners.  You will then be able to see the shape the vest will make.
  4. Cut directly up the front seam with scissors.  Start at the bottom, between where the handles were and cut all the way up the middle until you reach your drawn V.  Then cut the shape of the V you drew.  Also cut out the armpits you drew.  You can either double cut – cut the front and back part of the bag together.  Or you can simply cut out the front and then free-style cut the back side, which is what I did.
  5. Open up your bag, so the flap is now expanded.  Now, you will just cut at the top straight across that flap (which is normally the bottom of a grocery bag) in two straight lines, continuing from where you ended your “v”.   When you reach the end of the flap, simply cut a little scoop neck for the back of the vest.  Turn your vest inside out now!
  6. Take your scraps (or an extra bag if you have) and cut out two long rectangular strips for your pockets.  Fold each strip into thirds, and round off the top flap of the pocket.  I made a faux pocket and glued it shut.  Make sure your pockets are uniform to one another.  I drew a little dot to resemble a button on each pocket.
  7. Glue your pockets to the vest.
  8. Personalize your vest – write the child’s name above a pocket and add any extra flair you want.

IMG_5491


Admission: in order to get Casey to wear this paper vest, I bribed him with candy.  The glories of being an aunt.

IMG_3940

For the final touches of this outfit, accessorize!  Here is Casey modeling his vest with a giant snake!!


IMG_3949


Also, to complete the outfit (I was lazy), you should really accompany this with some cargo or khaki shorts and a safari floppy hat!  Finally, you can make some really easy binoculars out of two toilet paper rolls!  See the instructions here.

Even without these extras, the vest was super cute alone.  We had a great birthday celebration at the Safari!!

IMG_3952

Posted in DIY